

-
创建者:
 虚拟的现实,上次更新时间:7月 10, 2026
需要 5 分钟阅读时间
虚拟的现实,上次更新时间:7月 10, 2026
需要 5 分钟阅读时间
1. 简介
环境搭建参照docker-部署安装 keycloak和docker-本地部署 outline
之前是用了 Azure Active Directory,在手机的 EDGE 浏览器登录的时候,非要拉起微软自己的 APP,华为手机还不支持。所以我们现在要干掉 Azure Active Directory,改为自己的群晖 AD 用户。
2. 配置步骤
2.1. KeyCloak中创建新的Realm
首先,我建议是单独创建一个realm,不要使用KeyCloak默认的master,好处是可以做到用户数据和应用的隔离,保证KeyCloak的安全性。
登录KeyCloak的后台,左上角有个下拉,默认是master,点击下拉菜单,然后点击『Create Realm』
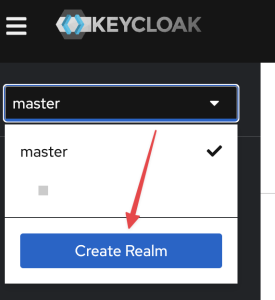
realm name自己起一个,要用英文小写(因为大小写区分,用大写容易出错)。
比如写一个app吧。然后点击Create。
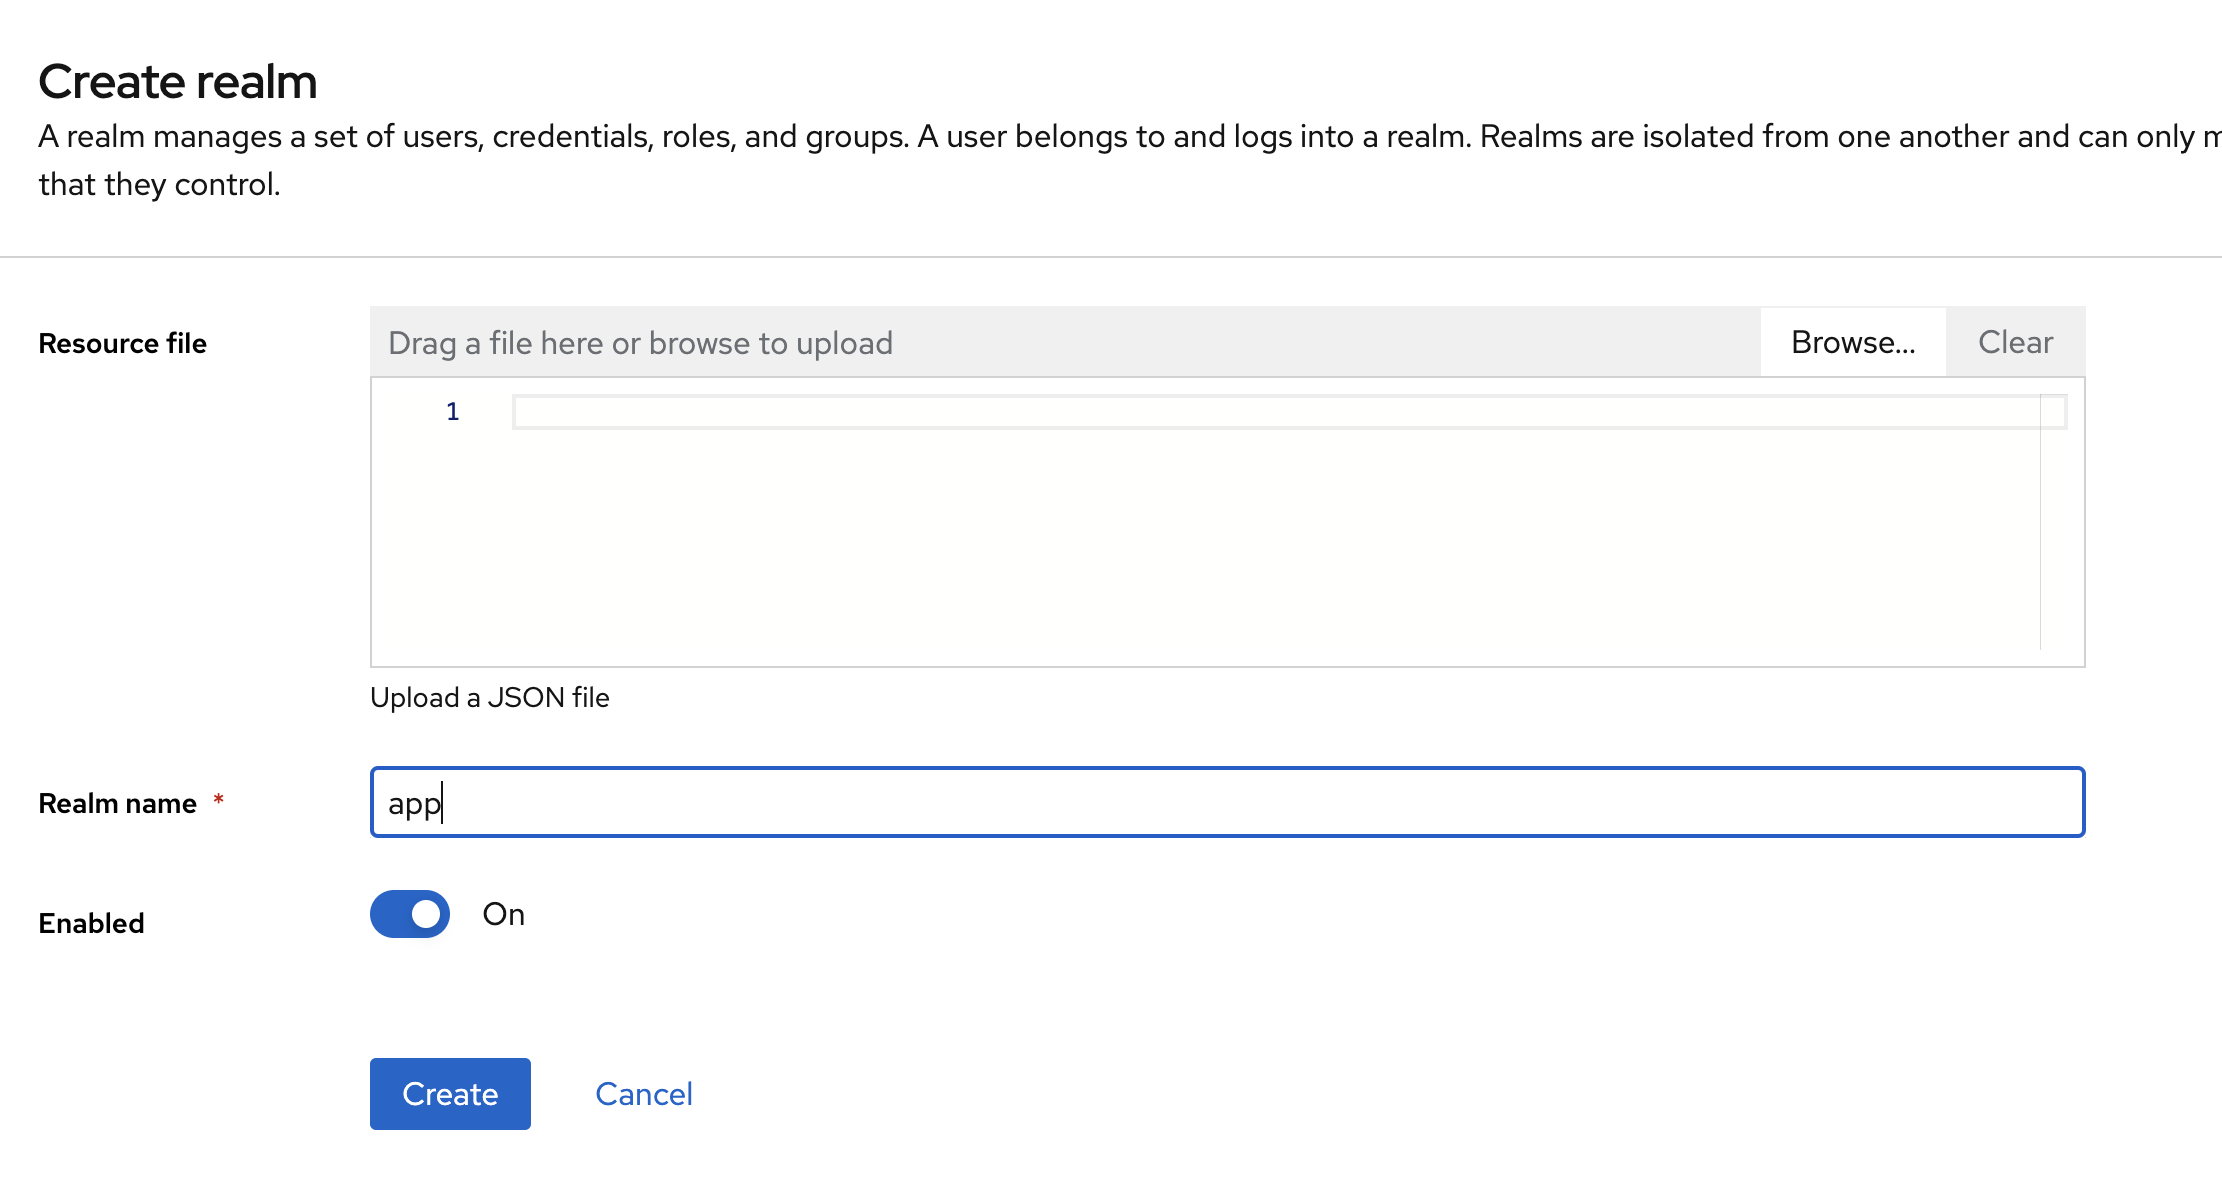
创建完以后,URL就会类似于https://<域名>/realms/<realm name>/protocol/openid-connect/auth
2.2. KeyCloak 中配置 User Federation,使用 Synology Directory Server
因为每个realm都是单独隔离的,新创建的realm不能复用master的用户数据,所以用户的数据源需要重新配置。参考 Keycloak 使用群晖 Synology Directory Server 作为AD/LDAP用户数据源
2.3. KeyCloak 中创建新的 Client
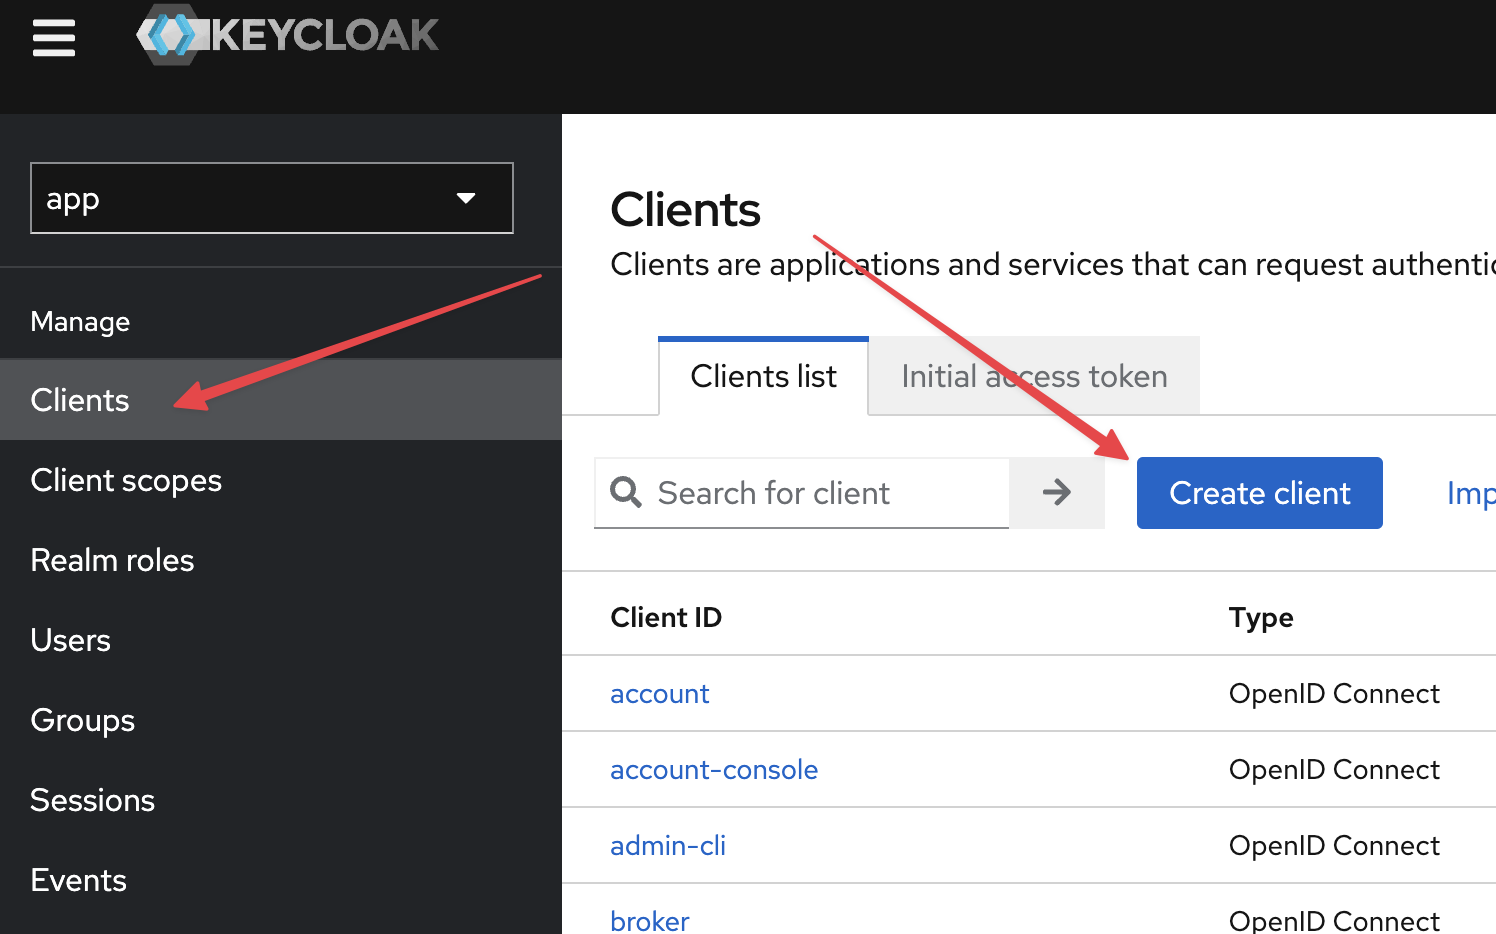
左侧菜单点击『Clients』,然后右侧点击『Create Client』
Client type 选择 OpenID Connect,Client ID 输入小写的outline(和前面 realm name 一样,因为要用于验证,所以小写,避免搞错),Name 可以输入大写的 Outline,点击 Next。
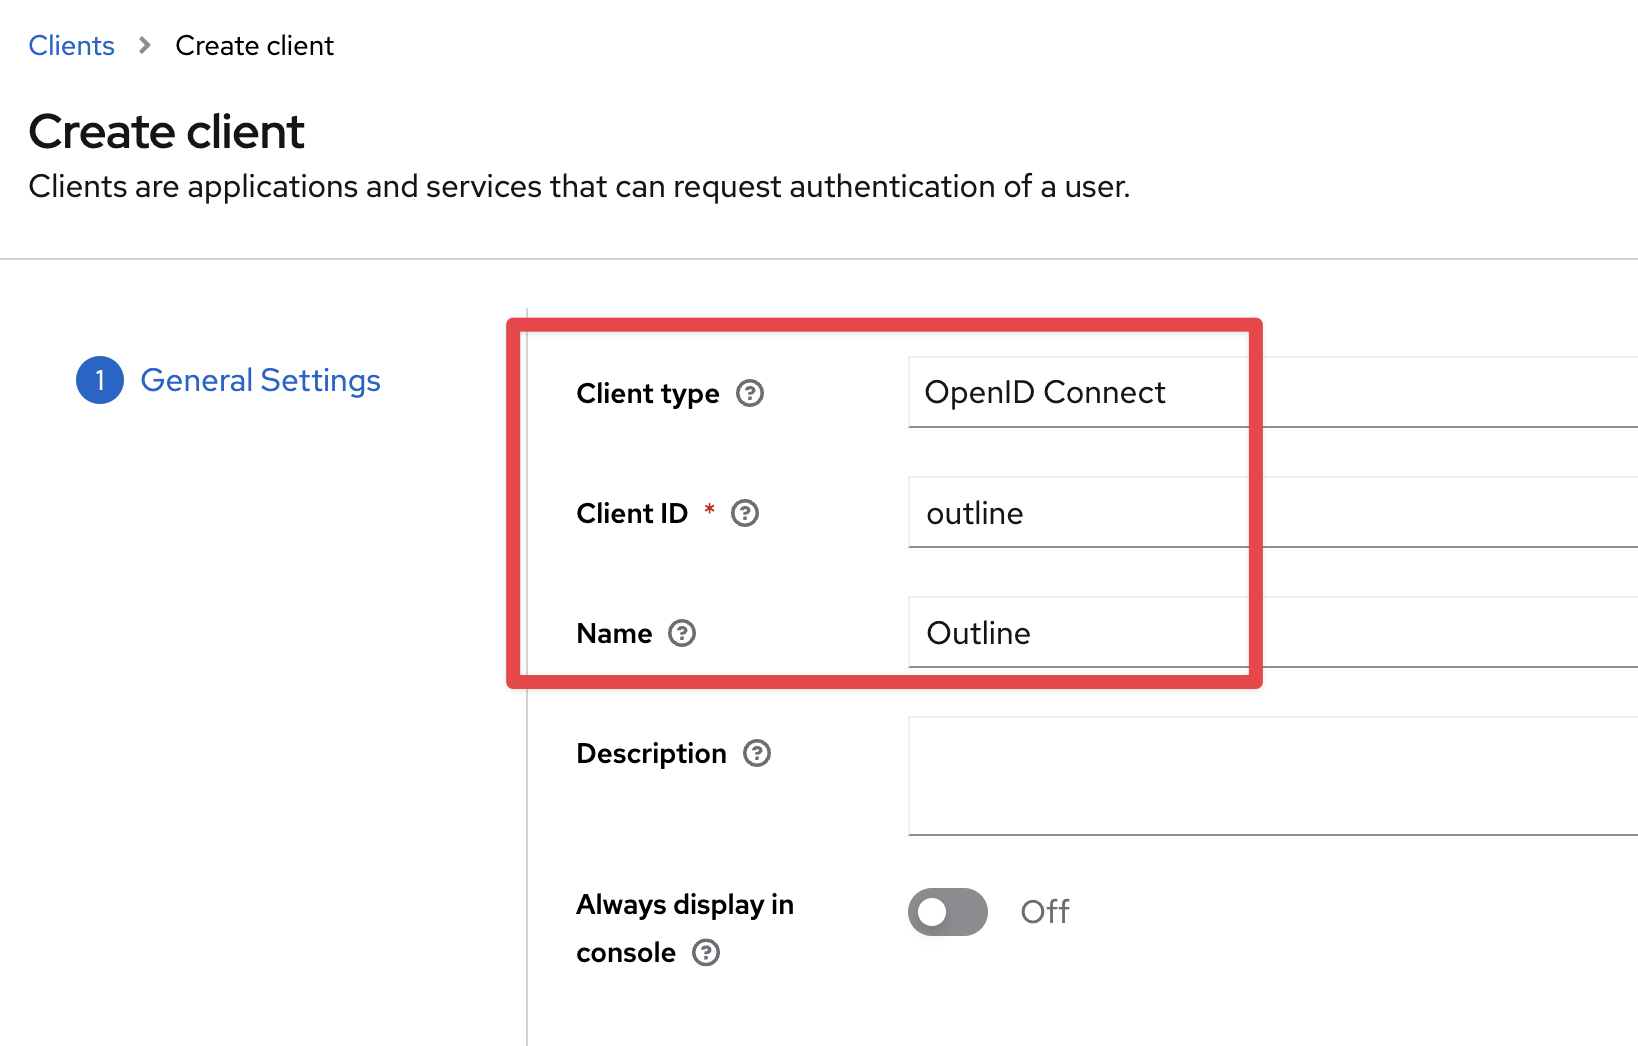
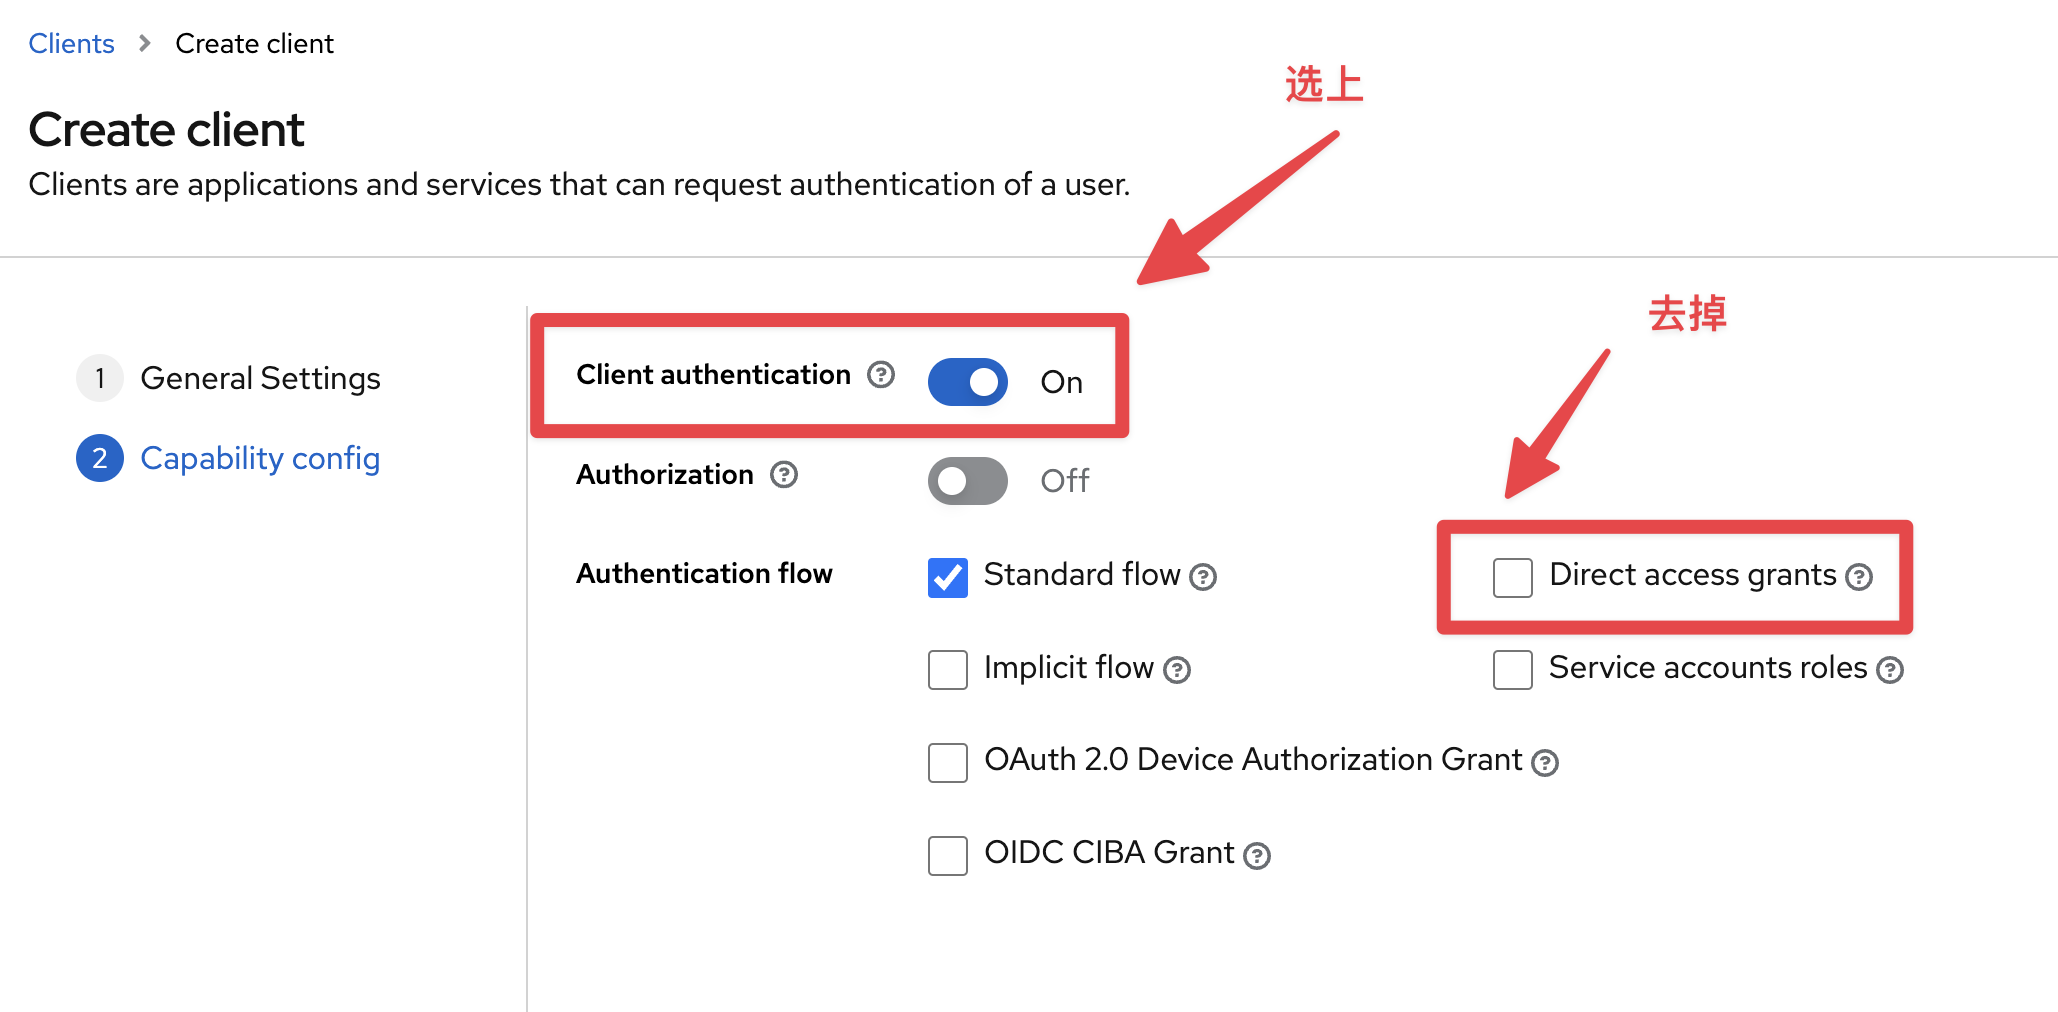
Client authentication 选上,Direct access grants 去掉,点击 Save
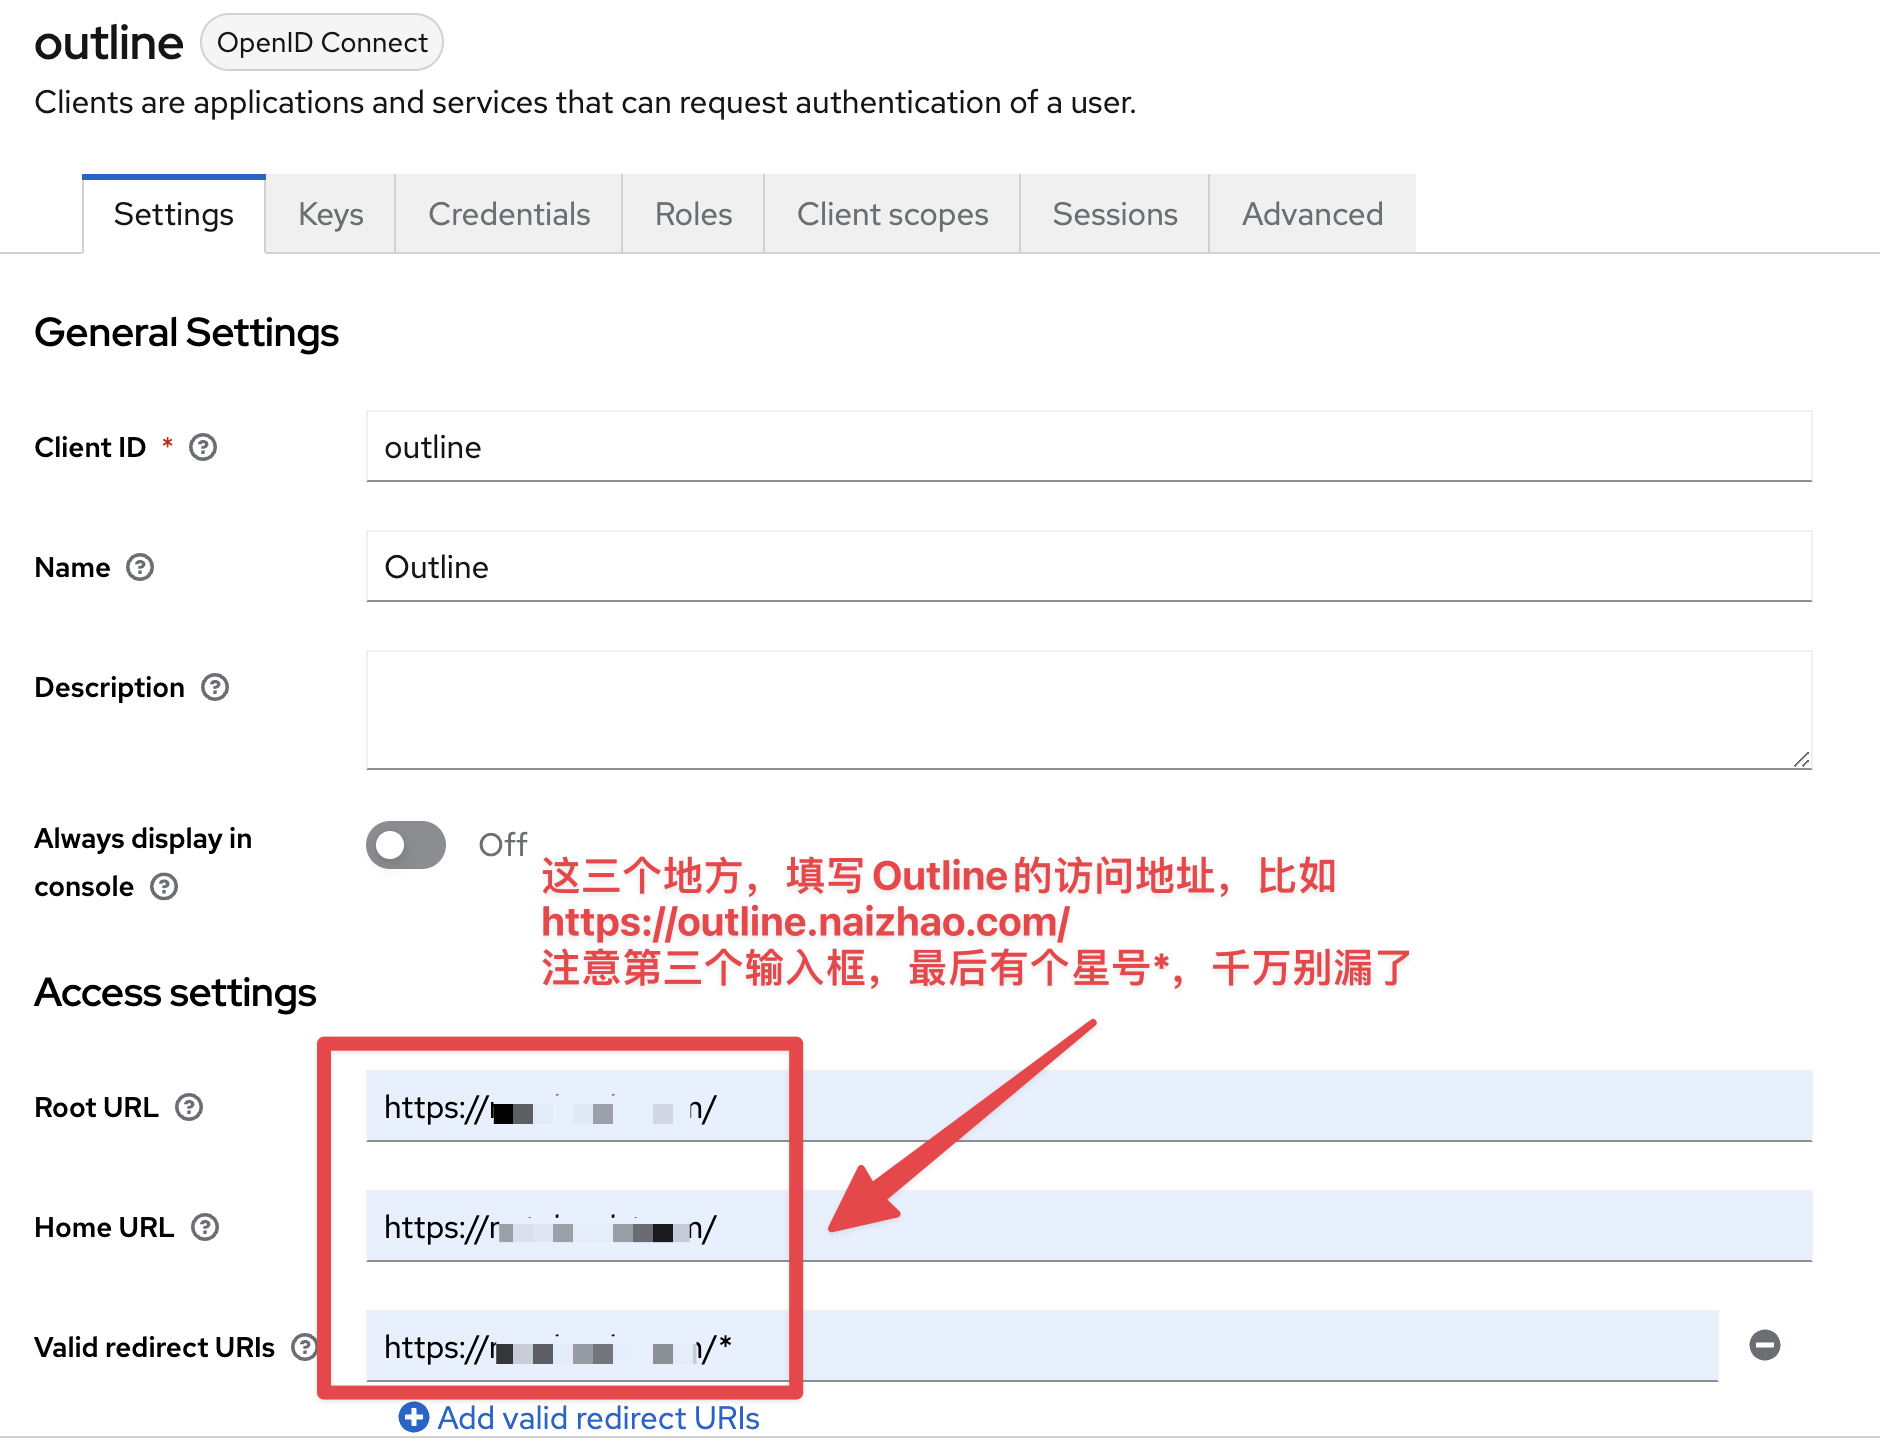
参考下面的图片填写三个框,填完后点击 Save 保存
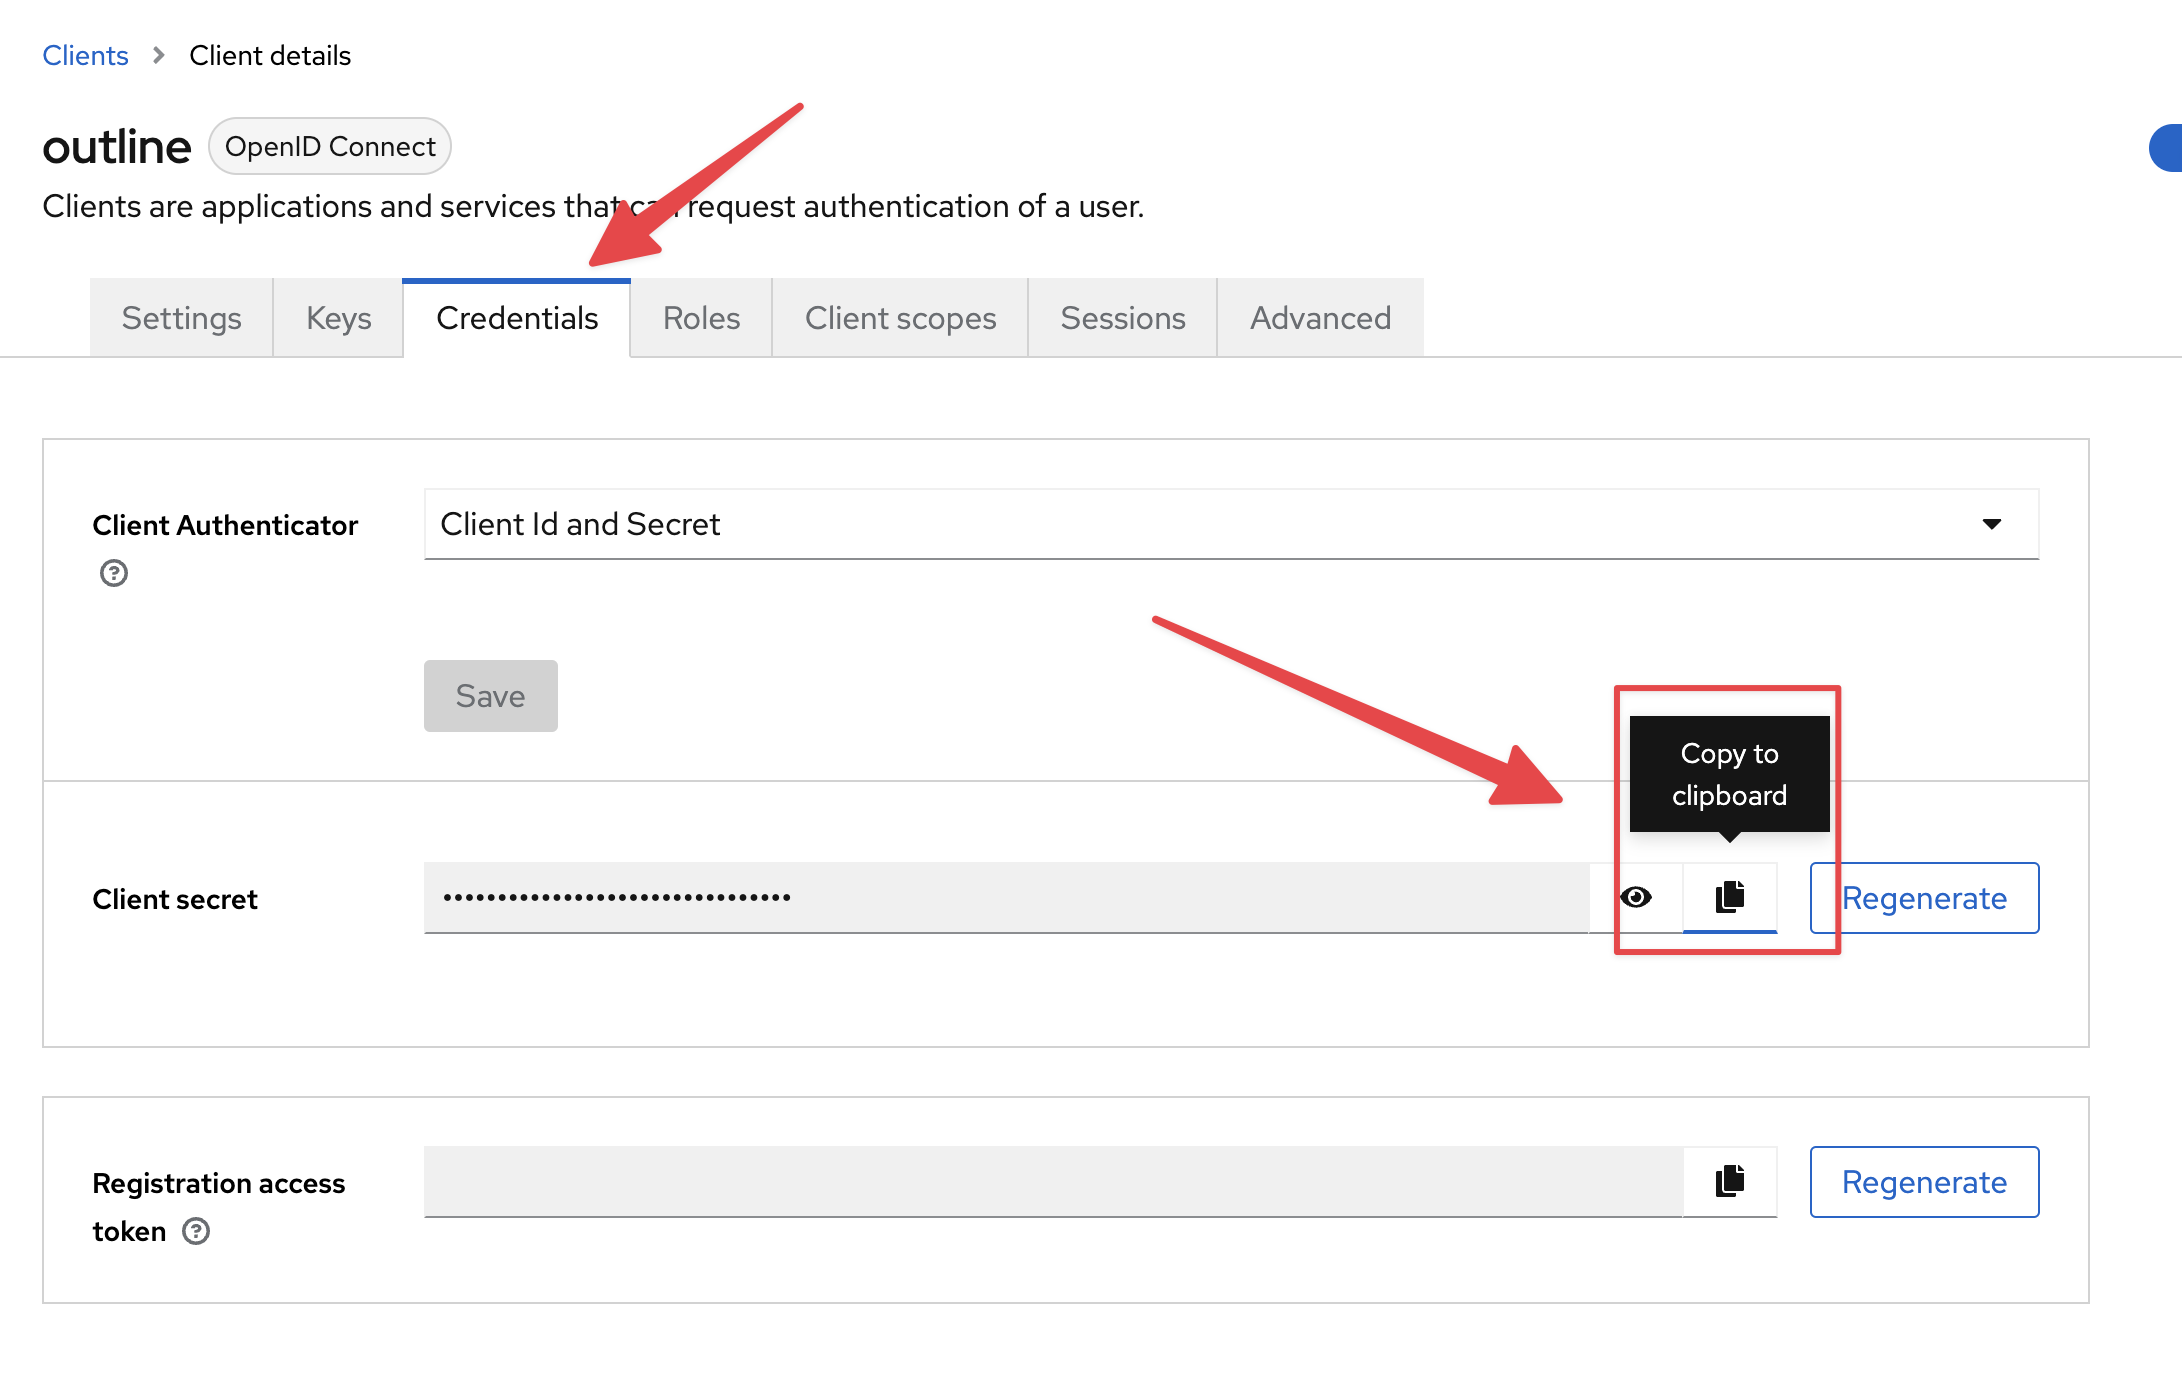
点击 Credentials,然后点击 Client secret 右侧的拷贝小按钮,把秘钥拷贝出来备用
2.4. 修改 Outline 的配置,添加 KeyCloak 作为 OIDC
如果你是按照《本地快速部署Outline》来安装 Outline 的,那么修改 docker.env 文件,找到 OIDC 这段,修改成下面的样子
# To configure generic OIDC auth, you'll need some kind of identity provider.
# See documentation for whichever IdP you use to acquire the following info:
# Redirect URI is https://<URL>/auth/oidc.callback
OIDC_CLIENT_ID=outline
OIDC_CLIENT_SECRET=<前面拷贝出来的Client secret>
OIDC_AUTH_URI=https://<KeyCloak域名>/realms/<realm名字>/protocol/openid-connect/auth
OIDC_TOKEN_URI=https://<KeyCloak域名>/realms/<realm名字>/protocol/openid-connect/token
OIDC_USERINFO_URI=https://<KeyCloak域名>/realms/<realm名字>/protocol/openid-connect/userinfo

# Specify which claims to derive user information from
# Supports any valid JSON path with the JWT payload
OIDC_USERNAME_CLAIM=email

# Display name for OIDC authentication
OIDC_DISPLAY_NAME=<用来给Outline显示登录的文案,比如『Bra SSO Server』>

# Space separated auth scopes.
OIDC_SCOPES=email openid profile
2.5. outline.yml
services:
  outline_redis:
    image: redis:7.0.10
    restart: always
    container_name: outline_redis
    networks:
      outline-net:
        ipv4_address: ${SUBNET_PREFIX}.2
    cap_drop:
      - net_raw

  outline_postgres:
    image: postgres:15.2
    restart: always
    container_name: outline_postgres
    security_opt:
      - label:disable
    environment:
      - POSTGRES_PASSWORD=0da68
      - POSTGRES_USER=outline
      - POSTGRES_DB=outline
    networks:
      outline-net:
        ipv4_address: ${SUBNET_PREFIX}.3
    cap_drop:
      - net_raw
    volumes:
      - /data/outline/db:/var/lib/postgresql/data
      - /etc/localtime:/etc/localtime:ro

  outline:
    image: outlinewiki/outline:0.84.0
    user: root
    restart: always
    container_name: outline
    command: sh -c "yarn start --env=production-ssl-disabled"
    environment:
      - DATABASE_URL=postgres://outline:0da68@outline_postgres:5432/outline
      - REDIS_URL=redis://outline_redis:6379
    depends_on:
      - outline_postgres
      - outline_redis
    volumes:
      - /data/outline/file:/var/lib/outline/data
      - /etc/localtime:/etc/localtime:ro
    env_file:
      - .env
    ports:
      - 10081:3000
    networks:
      outline-net:
        ipv4_address: ${SUBNET_PREFIX}.4
    cap_drop:
      - net_raw
networks:
  outline-net:
    name: outline-net
    driver: bridge
    ipam:
      driver: default
      config:
        - gateway: ${SUBNET_PREFIX:?SUBNET_PREFIX required}.1
          subnet: ${SUBNET_PREFIX}.0/24
    driver_opts:
      com.docker.network.bridge.name: outline-net
2.6. .env
SUBNET_PREFIX=172.22.225

NODE_ENV=production

SECRET_KEY=93d039f2
UTILS_SECRET=9b8c3dc9
#DATABASE_URL=postgres://outline:${POSTGRES_PASSWORD}@outline-postgres/outline
DATABASE_CONNECTION_POOL_MIN=
DATABASE_CONNECTION_POOL_MAX=

#REDIS_URL=redis://outline-redis:6379
URL=https://outline.waringid.me
PORT=3000

# See [documentation](docs/SERVICES.md) on running a separate collaboration
# server, for normal operation this does not need to be set.
COLLABORATION_URL=

FILE_STORAGE=local
FILE_STORAGE_LOCAL_ROOT_DIR=/var/lib/outline/data
FILE_STORAGE_UPLOAD_MAX_SIZE=262144000
FILE_STORAGE_IMPORT_MAX_SIZE=
FILE_STORAGE_WORKSPACE_IMPORT_MAX_SIZE=


OIDC_CLIENT_ID=outline
OIDC_CLIENT_SECRET=XXXXX
OIDC_AUTH_URI=https://key.waringid.me/realms/app/protocol/openid-connect/auth
OIDC_TOKEN_URI=https://key.waringid.me/realms/app/protocol/openid-connect/token
OIDC_USERINFO_URI=https://key.waringid.me/realms/app/protocol/openid-connect/userinfo
#OIDC_LOGOUT_URI=https://key.waringid.me/realms/app/protocol/openid-connect/logout?redirect_uri=https://outline.waringid.me/
OIDC_LOGOUT_URI=https://key.waringid.me/realms/app/protocol/openid-connect/logout?client_id=outline
OIDC_USERNAME_CLAIM=preferred_username
OIDC_DISPLAY_NAME=Outline App OIDC
OIDC_SCOPES=openid profile email


CDN_URL=https://outline.waringid.me

PGSSLMODE=disable
FORCE_HTTPS=false
ENABLE_UPDATES=true
WEB_CONCURRENCY=1
DEBUG=http
LOG_LEVEL=info


SMTP_HOST=smtp.139.com
SMTP_PORT=465
SMTP_USERNAME=13600000000@139.com
SMTP_PASSWORD=epassword
SMTP_FROM_EMAIL=1360000000@139.com
SMTP_REPLY_EMAIL=
SMTP_TLS_CIPHERS=
SMTP_SECURE=true

AWS_S3_ACL=private

LANGUAGE_CODE=en-us
TIME_ZONE=Asia/Shanghai
DEFAULT_LANGUAGE=zh_CN
3. 版本 1.9.0
outline 1.8.0 版本后升级了 cookie 的安全等级,后端的应用要确保前端是通过 https 访问,否则会中止后续的访问。当前我部署的的访问路径是【cpolar】-【雷池 WAF】-【Outline 应用】。升级版本后一直报 500 错误。
3.1. 错误信息
outline 页面能够访问,但是点击登录后显示 500 错误,容器内部的日志是如下提示:
Error: Cannot send secure cookie over unencrypted connection
at Cookies.set (/opt/outline/node_modules/cookies/index.js:126:11)
at StateStore.store (/opt/outline/build/server/utils/passport.js:123:29)
at OAuth2Strategy.authenticate (/opt/outline/node_modules/passport-oauth2/lib/strategy.js:291:28)
at OIDCStrategy.authenticate (/opt/outline/build/plugins/oidc/server/auth/OIDCStrategy.js:16:15)
at attempt (/opt/outline/node_modules/@outlinewiki/koa-passport/node_modules/passport/lib/middleware/authenticate.js:369:16)
at authenticate (/opt/outline/node_modules/@outlinewiki/koa-passport/node_modules/passport/lib/middleware/authenticate.js:370:7)
at /opt/outline/node_modules/@outlinewiki/koa-passport/lib/framework/koa.js:194:7
at new Promise (<anonymous>)
at /opt/outline/node_modules/@outlinewiki/koa-passport/lib/framework/koa.js:193:12
at /opt/outline/node_modules/@outlinewiki/koa-passport/lib/framework/koa.js:143:7
at new Promise (<anonymous>)
at passportAuthenticate (/opt/outline/node_modules/@outlinewiki/koa-passport/lib/framework/koa.js:107:15)
at dispatch (/opt/outline/node_modules/koa-router/node_modules/koa-compose/index.js:44:32)
at next (/opt/outline/node_modules/koa-router/node_modules/koa-compose/index.js:45:18)
at startOAuthFlow (/opt/outline/build/server/utils/passport.js:60:16)
at dispatch (/opt/outline/node_modules/koa-router/node_modules/koa-compose/index.js:44:32)
3.2. 排查过程
1、官网 github 有对应的 issue 说明,意思是代理服务器的 X-Forwarded-Proto 设置问题,虽然前端是通过 https 访问,但是最终 outline 接收到的是 http 最终导致无法访问
2、我在雷池 WAF 上按要求设置了强制使用 https 的内容,X-Forwarded-Proto: https。但是仍然存在错误。我需要得到 WAF 实际获取的日志信息里 X-Forwarded-Proto 的值是否是 https
3、设置 WAF 对应的站点日志。/data/waf/resources/nginx/sites-enabled/IF_backend_16
log_format outline '$remote_addr | $remote_user | [$time_local] | "$host" | "$request" | '
                    '$status | $body_bytes_sent | "$http_referer" '
                    '"$http_user_agent" | "$http_x_real_ip" | "$http_x_forwarded_for" '
                    'X-Forwarded-Proto="$http_x_forwarded_proto" ' | 'scheme="$scheme"';
4、增加该站点的自定义内容。/data/waf/resources/nginx/custom_params/backend_16
access_log  /var/log/nginx/outline_access.log  outline;
proxy_set_header X-Forwarded-Proto https;
5、应用配置并检查日志信息
docker exec safeline-tengine nginx -t
docker exec safeline-tengine nginx -s reload
tail -f logs/nginx/outline_access.log
以下是 waf 的 Nginx 日志(WAF 是基于nginx 的)
192.168.77.4 | - | [10/Jul/2026:15:40:57 +0800] | "outline.waringid.me" | "GET / HTTP/1.1" | 200 | 2734 | "-" "Mozilla/5.0 (Windows NT 10.0; Win64; x64) AppleWebKit/537.36 (KHTML, like Gecko) Chrome/149.0.0.0 Safari/537.36" | "23.249.17.84" | "23.249.17.84" X-Forwarded-Proto="https" |scheme="http"
192.168.77.4 | - | [10/Jul/2026:15:40:58 +0800] | "outline.waringid.me" | "POST /api/auth.info HTTP/1.1" | 401 | 85 | "-" "Mozilla/5.0 (Windows NT 10.0; Win64; x64) AppleWebKit/537.36 (KHTML, like Gecko) Chrome/149.0.0.0 Safari/537.36" | "23.249.17.84" | "23.249.17.84" X-Forwarded-Proto="https" |scheme="http"
192.168.77.4 | - | [10/Jul/2026:15:40:59 +0800] | "outline.waringid.me" | "POST /api/auth.config HTTP/1.1" | 200 | 206 | "-" "Mozilla/5.0 (Windows NT 10.0; Win64; x64) AppleWebKit/537.36 (KHTML, like Gecko) Chrome/149.0.0.0 Safari/537.36" | "23.249.17.84" | "23.249.17.84" X-Forwarded-Proto="https" |scheme="http"
192.168.77.4 | - | [10/Jul/2026:15:41:01 +0800] | "outline.waringid.me" | "GET /static/sw.js HTTP/1.1" | 200 | 13425 | "https://outline.waringid.me/static/sw.js" "Mozilla/5.0 (Windows NT 10.0; Win64; x64) AppleWebKit/537.36 (KHTML, like Gecko) Chrome/149.0.0.0 Safari/537.36" | "23.249.17.84" | "23.249.17.84" X-Forwarded-Proto="https" |scheme="http"
3.2.1. 日志分析结果
1、192.168.77.4(请求源 IP):
这是雷池 WAF 接收到请求的直接上游 IP。这说明在雷池 WAF 前面,还有一个代理层(比如:公司的 ALB、F5、Nginx 反代,或者 Cloudflare 等 CDN)。真正的客户端公网 IP 是后面的 23.249.17.84。
2、X-Forwarded-Proto="https":
这是最外层的代理(公网 HTTPS 终结处)传给雷池 WAF 的。说明最外层非常守规矩,明确告诉了下游:“用户用的是 HTTPS 访问的”。
3、scheme="http"(致命伤):
这是雷池 WAF(基于 Nginx)自己内部变量 $scheme 的值。因为最外层代理和雷池 WAF 之间走的是内网 HTTP 协议,所以雷池 WAF 认为当前的请求协议是 http。
3.2.2. 500 错误发生的逻辑闭环(为什么会死)
我在雷池 WAF 的配置中确认了包含:proxy_set_header X-Forwarded-Proto $scheme; 当一个登录请求进来时,发生了一场“内鬼抹杀正确信息”的惨剧:
1、最外层代理把请求发给雷池 WAF,此时带有的 Header 是:X-Forwarded-Proto: https。
2、雷池 WAF 收到请求,准备转发给 Outline(192.168.77.101:10088)。
3、在转发前,雷池执行了你的配置:proxy_set_header X-Forwarded-Proto $scheme;。
4、此时雷池把自己的 $scheme(也就是 http)赋给了 X-Forwarded-Proto。
5、结果:最外层传过来的珍贵的 https 标记,被雷池 WAF 用自己的 http 给覆盖抹煞了!
6、Outline 收到请求后,看到 X-Forwarded-Proto 是 http,心里想:“这连接不安全啊”,于是拒绝下发 Secure Cookie,直接抛出 500 Cannot send secure cookie over unencrypted connection。
4. 解决方案
1、调整 nginx.conf,增加以下的内容
  map $http_x_forwarded_proto $inherited_proto {
    default $http_x_forwarded_proto;
    ''      $scheme;
}

    include /etc/nginx/conf.d/*.conf;
2、调整 /data/waf/resources/nginx/proxy_params
set $host_fixed $http_host;
if ($http_host = "") {
    set $host_fixed "default";
}

#proxy_set_header X-Real-IP $remote_addr;
#add_header       X-Served-By $host;
#proxy_set_header Host $host;
#proxy_set_header X-Forwarded-For    $proxy_add_x_forwarded_for;
#proxy_set_header X-Real-IP          $remote_addr;
#proxy_set_header X-Forwarded-For $proxy_add_x_forwarded_for;
#proxy_set_header X-Forwarded-Proto $scheme;
proxy_set_header X-Forwarded-Proto $inherited_proto;

proxy_http_version 1.1;
proxy_set_header Upgrade $http_upgrade;
proxy_set_header Connection $connection_upgrade;
proxy_hide_header X-Powered-By;
proxy_set_header Accept-Encoding "";
3、重新加载 nginx 后正常
添加评论