-
创建者:
虚拟的现实,上次更新时间:1月 18, 2024 需要 5 分钟阅读时间
背景
公司使用的华为防火墙需要配置双因子登录认证。
搭建FreeIPA
首先设置 hostname
hostnamectl set-hostname freeipa.rendoumi.local
echo "192.168.1.5 freeipa.rendoumi.local" >> /etc/hosts
然后安装 FreeIPA,注意要回答的几个问题
- 不装bind,无论是 dnsmasq 或 coredns,都比 bind 轻,要装也装那两个。
- server hostname 是 freeipa.rendoumi.local
- domian name 是 rendoumi.local
- realm name 是大写的 RENDOUMI.LOCAL
- 有两个密码,第一个是 LDAP 的密码,第二个是 IPA 的密码
yum -y install deltarpm
yum update
yum -y install freeipa-server
sysctl net.ipv6.conf.all.disable_ipv6=0
ipa-server-install

This program will set up the IPA Server.

This includes:
  * Configure a stand-alone CA (dogtag) for certificate management
  * Configure the Network Time Daemon (ntpd)
  * Create and configure an instance of Directory Server
  * Create and configure a Kerberos Key Distribution Center (KDC)
  * Configure Apache (httpd)

To accept the default shown in brackets, press the Enter key.

WARNING: conflicting time&date synchronization service 'chronyd' will be disabled in favor of ntpd

Do you want to configure integrated DNS (BIND)? [no]:no

Server host name [freeipa.rendoumi.local]:

Please confirm the domain name [rendoumi.local]:

Please provide a realm name [RENDOUMI.LOCAL]:

Directory Manager password:
Password (confirm):
...
IPA admin password:
Password (confirm):

The IPA Master Server will be configured with:
Hostname:       freeipa.rendoumi.local
IP address(es): 192.168.1.5
Domain name:    rendoumi.local
Realm name:     RENDOUMI.LOCAL

Continue to configure the system with these values? [no]: yes

The following operations may take some minutes to complete.
Please wait until the prompt is returned.

Configuring NTP daemon (ntpd)

...

Setup complete

Next steps:
        1. You must make sure these network ports are open:
                TCP Ports:
                  * 80, 443: HTTP/HTTPS
                  * 389, 636: LDAP/LDAPS
                  * 88, 464: kerberos
                UDP Ports:
                  * 88, 464: kerberos
                  * 123: ntp

        2. You can now obtain a kerberos ticket using the command: 'kinit admin'
           This ticket will allow you to use the IPA tools (e.g., ipa user-add)
           and the web user interface.

Be sure to back up the CA certificate stored in /root/cacert.p12
This file is required to create replicas. The password for this file is the Directory Manager password
验证
以上,就装好了 FreeIPA,配置文件在 /etc/ipa/default.conf 验证一下:
# 输入ipa密码
kinit admin
klist

ipactl status
# sn 输入 01
ipa cert-show
登录
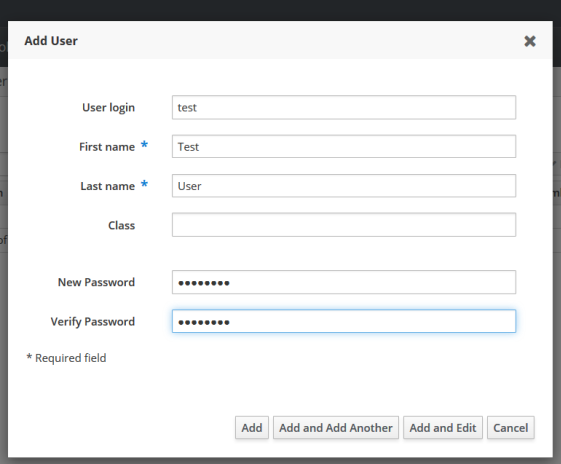
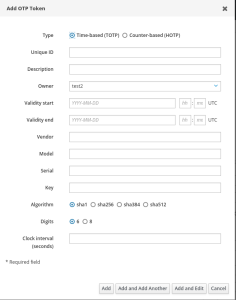
http://freeipa.rendoumi.com ,(注意你访问的机器必须能解析到这个域名)用户名 admin ,密码是上面填入的 ipa 密码,建立一个新用户;然后给这个用户添加 OTP Token:


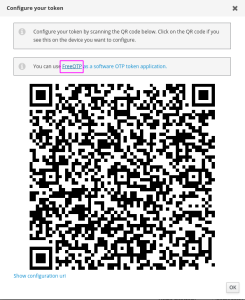
缺省什么都不用填,直接选 Add;会蹦出来一个二维码,建议是用 FreeOTP 扫描:


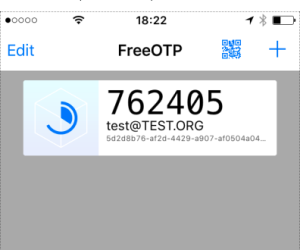
我们在手机上装上 FreeOTP 软件,扫描添加:

这样就ok了。下次登录的时候密码就是预设密码+FreeOTP密码合在一起。比如预设密码是 Fuck,otp密码是762405,合在一起就是 Fuck762405,一起输入即可。
那 FreeIPA 的部分就完成了。
搭建 FreeRadius
上面的部分其实是 FreeIPA 充当了用户数据库,用 LDAP 存放数据,而 Radius 需要从 IPA 拿到用户信息。
安装
yum -y install freeradius freeradius-utils freeradius-ldap freeradius-krb5
Radius 的配置都在 /etc/raddb 目录下:
编辑 /etc/raddb/client.conf ,增加一个网段的认证,允许 172.0.0.0/8 访问
client localnet {
        ipaddr = 172.0.0.0/8
        proto = *
        secret = Fuck2021
        nas_type = other
        limit {
                max_connections = 16
                lifetime = 0
                idle_timeout = 30
        }
}
同时修改下面的 clinet localhost 部分,修改 secret,之后我们要从本地登录做测试
client localhost {
        secret = ChinaBank2021
再修改 /etc/raddb/sites-enabled/default and /etc/raddb/sites-enabled/inner-tunnel ,支持 LDAP,有二处地方
把
        #
        #  The ldap module reads passwords from the LDAP database.
        -ldap
换成:
        #
        #  The ldap module reads passwords from the LDAP database.
        ldap
        if ((ok || updated) && User-Password) {
            update {
                control:Auth-Type := ldap
            }
        }
把
#       Auth-Type LDAP {
#               ldap
#       }
换成:
        Auth-Type LDAP {
                ldap
        }
然后 ldap 模块配置一下
ln -s /etc/raddb/mods-available/ldap /etc/raddb/mods-enabled/
我们先用 ldapsearch 搜索一下,看看具体的 dn 信息,这里输入之前设置的 ldap 密码
ldapsearch -x -v -W -D 'cn=Directory Manager'  uid=test|grep test
ldap_initialize( <DEFAULT> )
Enter LDAP Password:
filter: uid=test
requesting: All userApplication attributes
memberOf: cn=test,cn=groups,cn=accounts,dc=rendoumi,dc=local
得到 cn=accounts,dc=rendoumi,dc=local
再去修改 /etc/raddb/mods-enabled/ldap 文件,修改 server 和 base_dn 与之对应:
        server = 'freeipa.rendoumi.local'
        base_dn = 'cn=accounts,dc=rendoumi,dc=local'
注意,上面我们没装 bind,所以必须在 /etc/hosts 存在记录,否则本地就访问不到了
验证
启动 radiusd 的调试模式:
radiusd –X
...
Listening on auth address * port 1812 as server default
Listening on acct address * port 1813 as server default
Listening on auth address :: port 1812 as server default
Listening on acct address :: port 1813 as server default
Listening on auth address 127.0.0.1 port 18120 as server inner-tunnel
Opening new proxy socket 'proxy address * port 0'
Listening on proxy address * port 36752
Ready to process requests
再开一个终端测试一下,注意,我们是从本地(127.0.0.1)发起测试的,所以对应要用到上面设置的 secret,用 admin 登录,就避免要用到 freeotp 的口令,这里 xxxxxxxx 是 admin 的密码:
radtest admin xxxxxxxx freeipa.rendoumi.local 1812 ChinaBank2021
Sent Access-Request Id 57 from 0.0.0.0:45247 to 172.18.31.41:1812 length 75
        User-Name = "admin"
        User-Password = "xxxxxxxx"
        NAS-IP-Address = 172.18.31.41
        NAS-Port = 1812
        Message-Authenticator = 0x00
        Cleartext-Password = "xxxxxxxx"
Received Access-Accept Id 57 from 172.18.31.41:1812 to 0.0.0.0:0 length 20
看到上面 Access-Accept 就ok了,ctrl-c 终止 radiusd 的运行,开启 radiusd 服务。
systemctl enable --now radiusd
然后在华为防火墙设置这个 radiusd 服务器就可以了。
参考资料:
- 无标签
0 评论